|
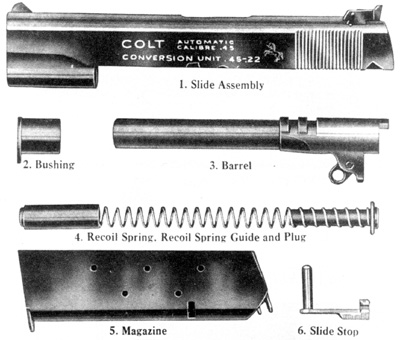
 COMPONENT PARTS
| 1 |
Slide Assembly, complete with Fixed Front Sight, Adjustable Rear Sight,
Extractor, Firing Pin, Firing Pin Spring and Firing Pin Stop. |
| 2 |
Bushing |
| 3 |
Barrel |
| 4 |
Recoil Spring, Recoil Spring Guide and Plug |
| 5 |
Magazine |
| 6 |
Slide Stop |
TO TAKE DOWN THE PISTOL.
Remove the magazine by pressing the magazine catch. (After removing magazine, look to
see that there is no cartridge left in the chamber.)
Press the plug inward with the index finger of the right hand (or butt of magazine).
Turn barrel bushing to the right until the plug is free to go forward; then release
tension on the spring gradually to prevent plug from jumping away. Draw slide back until
the rear edge of the smaller recess in the lower edge of the slide is even with the rear
end of the slide stop; press against end of slide stop which projects from the opposite
side of the receiver above the trigger guard, and draw out the stop.
This releases the barrel, link and slide, which may then together be drawn forward from
the receiver, carrying also the barrel bushing, recoil spring, and recoil spring"
guide. Remove the spring and guide from the slide. Turn the barrel bushing to the left as
far as it will go and draw forward from the slide. This releases the barrel which may then
be drawn forward and out if the link is tilted forward.
The foregoing is all the dismounting necessary to clean and properly care for the arm.
It is not necessary to remove stocks as all parts of the pistol can be dismounted and
assembled with the stocks in place.
In taking the pistol apart, use no hammer, as dismounting and assembling is quick and
easy after a little practice.
The hammer should not be snapped when slide is removed from the receiver.
TO COMPLETE DISMOUNTING
The safety lock is removed by cocking the hammer, then grasping the thumb piece of the
safety lock between the thumb and index finger, steadily pull outward and at the same time
move back and forth. Lower hammer (don't snap) and push out hammer pin using the safety
lock. Remove hammer and then, using hammer strut, push out the housing pin; then with the
hammer strut hooked into the lanyard loop, draw out main-spring housing which contains
main-spring. After pushing the sear pin from right to left, using hammer strut for this
purpose, the sear and disconnector may be removed.
To remove magazine catch, its checkered left end must be pressed inward far enough to
permit the catch lock to be turned to the left and out of its seat in the receiver, using
the short leaf of sear spring, when the catch with its lock and spring may be removed.
Care should be taken to not let the lock and spring jump away when released.
The trigger may then be removed rearward from the receiver.
To remove firing pin and its spring, take hammer strut and push rear end of pin inward
and at same time downward on the stop; this will start the stop from its seat in the
slide. When removing stop take care not to allow firing pin and its spring to jump away.
The extractor is now free and may be removed by pushing on its front end with the end of
the hammer strut.
To remove main-spring, cap and housing pin retainer from the main-spring housing, push
the mainspring cap pin partly out, and press main-spring cap down with hammer strut and
while pressing on the cap, pull the cap pin out. The parts may be then removed.
To assemble the pistol, proceed in reverse order, noting the
following cautions:
When replacing the slide and barrel on the receiver, hold the slide and receiver bottom
side up and see that the link is tilted forward as far as it will go and that the link pin
is in place.
To assemble the sear and disconnector, it is best to put the two together, then hold
the two by their lower ends and put them in place in the receiver and replace the sear
pin.
After the sear and disconnector are in place, replace sear spring and be sure its lower
end is located in the cut in the receiver and the upper end of the left-hand leaf resting
on the sear, then slide the main-spring housing in until its lower end projects below the
frame about one-eighth of an inch. Replace hammer and its pin; replace grip safety; cock
hammer and replace safety lock; lower hammer, then push main-spring housing home, making
hammer strut enter main-spring cap, and put housing pin in place.
When assembling safety lock, the end of the magazine follower which projects from the
magazine can be used to push the safety lock plunger back into the tube. (Hammer must be
cocked when doing this.)
When pressing the slide stop into place, see that its upper rear end stops on the
receiver, just under the small slide stop plunger, then push the stop upward and at same
time inward; this will cause the upper round part of the stop to push the plunger back and
the stop will snap into place. |